Noah came to visit us for a few weeks! He had a lot of school work to do including a project he needed to make, something called an anemometer. He designed it and in this video we make it! We had lots of fun and we both learned a few things!!! I made a longer and shorter version of this video. Thanks for joining us!
Noah came to visit us for a few weeks! He had a lot of school work to do including a project he needed to make, something called an anemometer. He designed it and in this video we make it! We had lots of fun and we both learned a few things!!!
I made a longer and shorter version of this video. Thanks for joining us!
I joined a group at a craft event and we all made something. One person wasn’t able to come after all so I bought her project pieces and put it together at home. In this video, I am putting it together! It is a really cool joy sign!
I put this verse on the back: Habakkuk 3:18 (gnt) I will still be joyful and glad, because the LORD God is my savior.
I found this really cute Christmas decoration idea on Pinterest. These little salt shaker snowmen decorations are so easy and so cute I thought I would show you how I make them. So in this video I make two and at the end of the video you can see eight different ideas I came up with. They are super easy!
I had a piece of juniper wood that I planed down and decided to draw some conifer and birch trees on it. Then I wood burned the drawing and painted the birch trees white. I added a few hooks to make it into a coat rack.
I put a verse on the back, it is a partial verse that says, “Put on your coat and follow me.” It is from Acts 12:8 and the entire verse says, “Then the angel told him, “Get dressed and put on your sandals.” And Peter did. Then the angel said, “Put on your coat and follow me.”” (new century version)
I had a few blunders along the way but nothing that couldn’t be fixed. So it took some trial and error to get it done but I really like how it turned out.
Here are a few things I used in the video today, these are affiliate links:
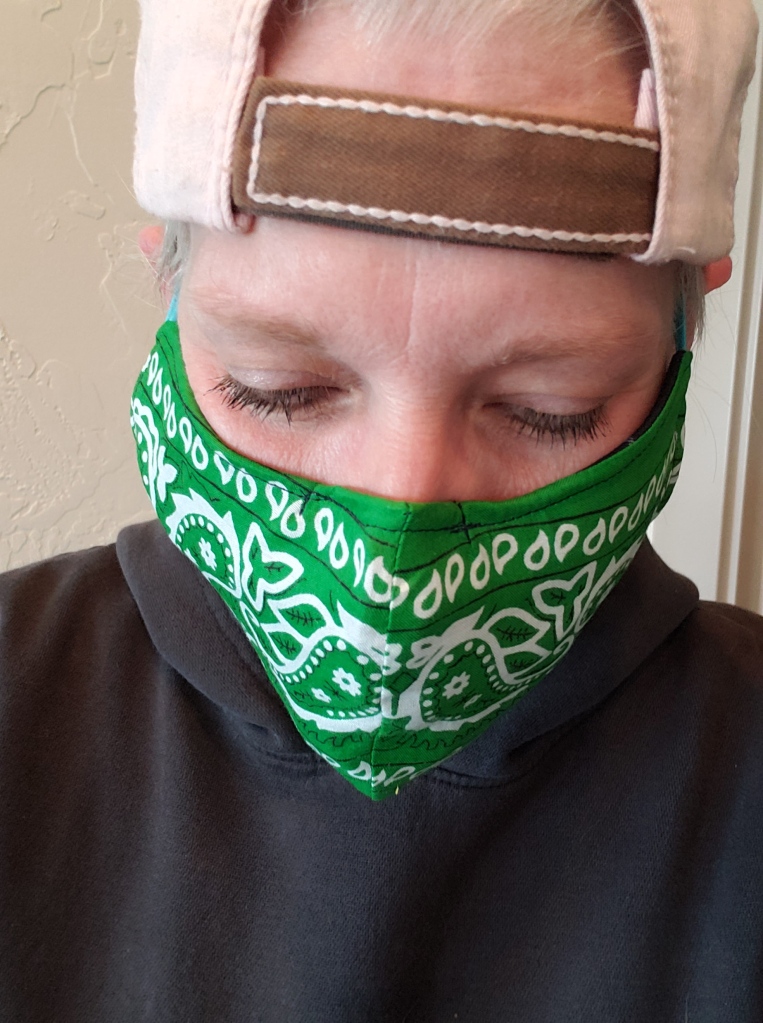
First of all, I want to say that I am not a sewing person. I sew occasionally but I don’t know much about it other than pushing the foot pedal and putting two pieces of material together. I am a woodworker at heart, but since masks are required at some places due to the virus, I would rather save my woodworking masks for woodworking. So that means I needed to make a mask.
I have a long video showing how I made my mask that I will plop in right here. But I also have a written tutorial with pictures below the video 🙂
I googled around and there are mask patterns everywhere. I found one I liked with a nifty filter area but it wasn’t comfortable. I found another but it had no filter. So I took the two ideas and I put them together to make a comfy mask that also has an opening type pocket for placing a filter. Here is the link to the free pattern that I used, it is available at Eat Pray Create.
Aslo, I tried this with heavy material and discovered that using lighter weight material works better, so I used a t-shirt and a bandana.
Here is how I made it:
I cut the tee shirt into two 8×12 pieces. And on the 12 inch side, smack dab in the middle of that 12 inches I sewed straight toward the center of the rectangle for approximately 2-3 inches, then left some space and sewed another 2-3 inches to the opposite side.
I ironed it to make it nice and flat but you don’t need to. Then you fold one of the 8 inch sides up.
Iron if you want then flip it over.
And now fold down one of the flaps on the side that now has 3 layers of fabric.
Iron this if you want too. You now should have a small opening, which will be the opening to the pocket where you can place a filter.
Next, fold this piece in half so the opening is on one side. Lay the pattern from Eat Pray Create so the front (curved side) is along the edge with the opening.
Trace the pattern and cut it out but make sure you do not separate the pieces that are on the opening edge. It should look like a butterfly when it is all cut out and unfolded.
Now fold the bandana and lay the pattern on it and trace the pattern.
Cut the bandana making two separate pieces.
Put those together and sew along the curved edge.
Take the t- shirt piece with the opening and sew along the curved edge going up above the filter opening and down below the filter opening. Sewing as you did the bandana but making sure you do not sew the filter opening shut.
Now turn the bandana right side out and put the bandana and the t-shirt pieces together. Making sure the finished edges are face to face.
The finished side of the t-shirt with the filter hole, see below.
With the finished side of the bandana facing the finished side of the t-shirt, like so below.
Cut two pieces of elastic, I used some headbands, You could use hair ties or even rubber bands I suppose.
And now you sow them in between the t-shirt and the bandana.
And then sew all the way around the bandana. Making sure to sew in the other elastic on the other side.
Cut off any excess material and hanging threads.
Then flip it right side out by pulling everything through the filter opening. Make sure to push out the corners.
You could stop here because the mask is basically done.
But I am going to add a little wire so that you can snug it up at the bridge of the nose, and sew an extra line around the edges of the mask to give it a little more strength.
Measure approximately 2″ of wire, I used 20 gauge, and I curled the ends.
Approximate where it’s going to go and sew some stitch lines at the ends.
The wire will fit inside of these lines.
Then insert the wire through the filter pocket opening and fit it in between those lines. Sew right along the bottom of the wire and keep going along the entire edge of the mask for reinforcement. You can also add a pleat in between the ear loop to snug up the mask even more. I forgot to do it on this mask, but I will add in a picture of one with a pleat.
And here is one with a pleat.
Clip off any hanging threads and the mask is all done. Use whatever filter material you like!
If you want to make this mask without dealing with the filter opening follow the directions by Taya Somes. Here are some links:
The filter pocket was made in this video by homemadeonourhomestead, but I found the mask to be uncomfortable and bulky. But I like the idea of the filter pocket thingy!
I wanted to make a strictly wood burned zebra after the very frustrating crayon zebra I made a few weeks ago. So I got out the wood burners and went to town! I also poured some epoxy over the top of this one!
Genesis 30:39 (NCV) …Then the young that were born were streaked, speckled, or spotted.
I tried to make a crayon zebra last summer and it was a total flop. So I tossed it away and have been thinking about it ever since. I just had to try it again.
I used a different zebra and routered it deeper to see if it would work better with the crayons. It helped some but I forgot that the crayon stains the wood (of course it stained areas I wanted to be white) so I added some woodburned doodles to try and save it.
I spent so much time on this project and it just doesn’t look like I was hoping. It was fun to experiment with the crayons though. And knowing me, I just may try it again one day. 🙂
I put Psalm 139:14 (NCV) on the back of this zebra because it says, “I praise you because you made me in an amazing and wonderful way.” And I thought it was perfect because a zebra is truly amazing and wonderful!
Here are some items I used in this video, some of these are affiliate links just so you know 🙂
Dust Mask: Protect Life Masks Get 30% off with the code: PROLIFE30 Can be used on first aid kits and dust masks. Protect Life website: http://www.firstaidkitsurvival.com
In this video I try to do the ink transfer technique. The little inkjet printer I have let me make one copy then wouldn’t make any more. When I took that one copy to the shop I got some rain drops on it and messed it up but I was still able to try the ink transfer technique. And it worked well. I just need a printer that works!
The project I was going to ink transfer to I ended up printing a toner copy and doing my same old trusty heat transfer using my woodburner. Luckily this video wasn’t about the project but about the transfer!
It works well and I will use it again for transferring patterns or words to wood that I plan to hand router.